
Kneeling Side Plank: The Side of Your Core Your Front Plank Misses
Have you ever held a front plank and thought, “My core is getting stronger”? That may be true — but there is one direction a standard front plank does not challenge as directly: sideways. Your trunk has to resist movement in more than one direction. It has to resist arching backwards, twisting, and bending sideways. That is where the side plank comes in.
And if a full side plank feels too difficult, you do not have to jump straight into the hardest version. The kneeling side plank gives you a legitimate starting point while still training the same basic skill: keeping your trunk from collapsing sideways. Today, I’ll show you what the kneeling side plank actually trains, why it complements the front plank, how to perform it correctly, and how to progress toward a full side plank.
⚠️ Disclaimer: This article is for educational and analytical purposes only. It does not constitute medical or fitness advice. Consult a qualified professional before starting any new exercise programme.
What the Exercise Does
The kneeling side plank is an isometric strength and stability exercise. That means your muscles are producing force while your body stays mostly still. You are not repeatedly crunching, twisting, or lifting your torso up and down.
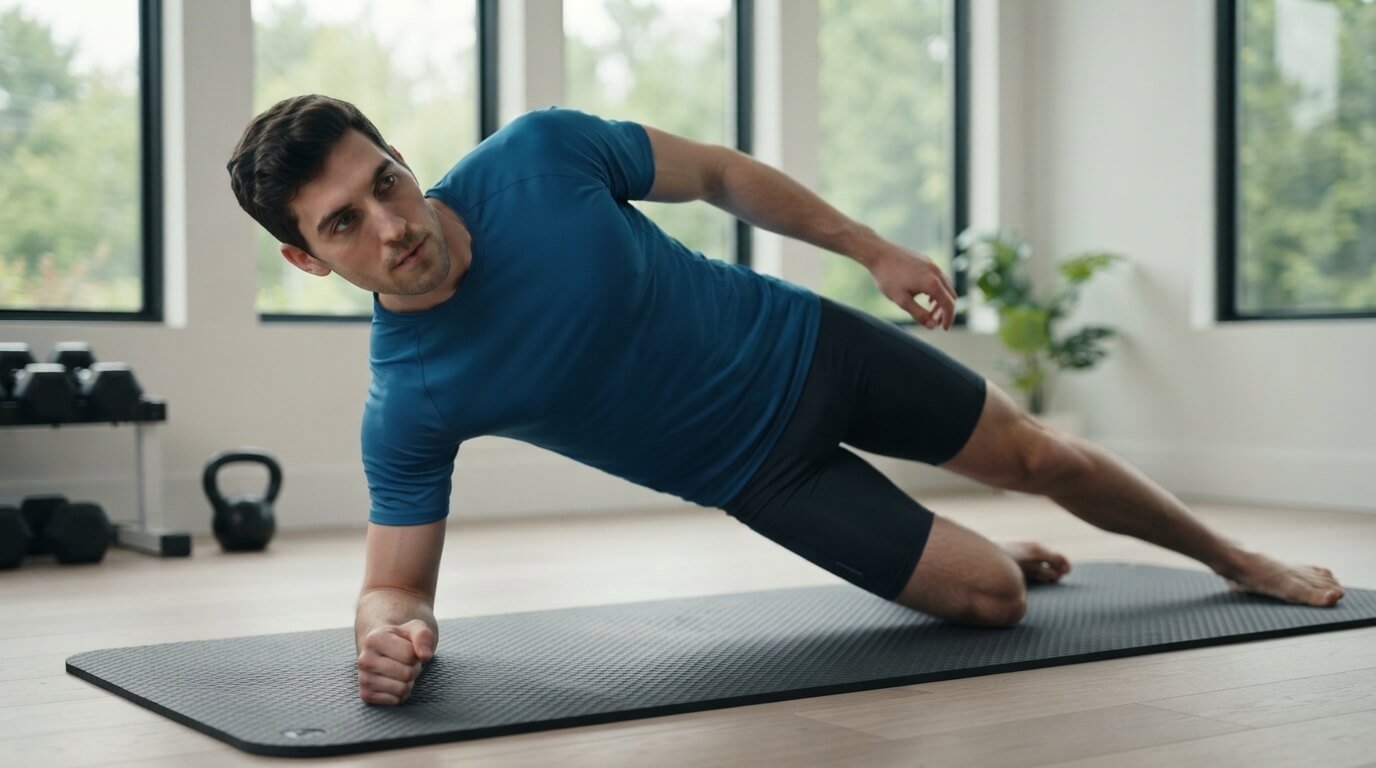
You lie on your side, support yourself on one forearm, bend your knees, and lift your hips away from the floor. Your body should form a fairly straight line from your head, through your trunk, to your knees. The challenge is that gravity is trying to pull your hips toward the floor. If you allow that to happen, your trunk bends sideways. Your job is to resist that movement.
In exercise-science language, this is called resisting lateral flexion. In normal English, it means resisting sideways bending. That is the central job of the side plank.
Watch the video above to see the movement in action.
Why Knees Down?
You may be wondering: if the full side plank is harder, why not simply start there? Because the position may be too demanding for your current strength, especially in the supporting shoulder, side of the trunk, and hip.
In a full side plank, your body is supported by the forearm and the side of the foot. Your legs are long, so your body’s weight is farther away from the elbow. That creates more torque around the shoulder and trunk. In the kneeling version, your knees become the lower support point, and bending the knees shortens the lever.
Here is a simple way to think about it. If you hold a weight close to your body, it is easier to control. If you hold the same weight farther away, it feels heavier because it creates more leverage. The kneeling side plank does something similar. The shorter body position reduces the demand, but it does not remove the sideways-stability challenge.
You are still learning to: keep your shoulder active, lift and control your hips, stack your ribs over your pelvis, resist rotation, and breathe while your trunk is braced. This is not just an easier version for people who cannot do the “real” exercise — it is a useful progression stage.
What Muscles Are Working?
The main muscles are the obliques and other muscles along the side of your trunk. Think of these muscles as helping to keep your ribs and pelvis from collapsing together. The quadratus lumborum, a deeper muscle along the side of the lower back, also contributes to keeping the pelvis from dropping. Together, these muscles form much of what people casually call the “side core.”
Your supporting shoulder is working too. The rotator cuff, serratus anterior, trapezius, and other shoulder-girdle muscles help keep the shoulder blade and upper arm stable while supporting your bodyweight.
The muscles around your hip also contribute. The gluteus medius and other hip stabilisers help keep the pelvis from rolling or dropping. The exact amount of work depends on the version you use.
📊 Track your progress: Use our Strength Standards to benchmark your core and overall strength, or the Waist-to-Hip Ratio to monitor body composition changes.
Side Plank Versus Front Plank
A standard front plank mainly challenges your ability to resist arching backward through the lower back — this is often called anti-extension. The side plank changes the direction of the challenge. Now gravity is trying to pull your hips toward the floor and bend your trunk sideways. This is anti-lateral-flexion: resisting sideways bending.
So it is not accurate to say that a side plank is simply a front plank turned ninety degrees. Changing the position changes the mechanical challenge. A front plank trains your ability to control the trunk from front to back. A side plank trains your ability to control the trunk from side to side. Both are useful. Neither one replaces the other.
How to Perform the Kneeling Side Plank
- Lie on your side with your knees bent (roughly 90 degrees).
- Place your supporting elbow directly under your shoulder.
- Your forearm should lie flat on the floor, pointing forward. Keep your hand relaxed.
- Your knees should be stacked, with one on top of the other.
- Before you lift, line up your shoulder, hip, and knee.
- Gently press your forearm into the floor. Do not shrug your shoulder toward your ear.
- Brace your trunk with firm, controlled tension around your middle.
- Lift your hips until your head, trunk, hips, and knees form a reasonably straight line.
- Keep your ribs stacked over your pelvis. Avoid letting the chest rotate toward the floor or opening toward the ceiling.
- Keep your head in line with your spine. Look forward or slightly ahead.
- Breathe steadily. Do not hold your breath to create tension.
Your goal is not to lift your hips as high as possible. Your goal is to find the highest position you can control without twisting, arching, shrugging, or losing your breath.
What Should You Feel?
You should normally feel the exercise in the side of your abdomen and waist. You may also feel the muscles around your lower ribs, the supporting shoulder and shoulder blade, and the outer hip. Mild shaking can be normal. A shorter, clean hold is more useful than a longer hold performed in a collapsed position.
What you should not feel is sharp pain, joint pinching, numbness, tingling, or a sense that the shoulder is slipping.
Common Mistakes
- Allowing the hips to drop. This usually means the hold is too long or the variation is too difficult. End the set earlier and repeat with better alignment.
- Lifting the hips too high. Aim for a straight, controlled line rather than maximum height.
- Rotating forward or backwards. Imagine your hips are headlights pointing straight ahead. Keep them stacked.
- Letting the supporting shoulder collapse. Actively press the forearm down and away from you.
- Elbow too far from the shoulder. Bring the elbow under the shoulder or slightly forward.
- Turning it into fast hip dips. Own the static position before adding movement.
How Long Should You Hold It?
There is no universal scientifically correct hold time for every beginner. The right duration depends on your current strength, your shoulder tolerance, and whether you can maintain good alignment. For many beginners, 10 to 20 seconds per side is a reasonable starting range. So yes, 20 seconds per side is defensible — but it is not a magic number.
You can begin with two sets per side. Rest approximately 45 to 90 seconds between efforts, or simply rest until you can repeat the position with reasonable quality. Train it two or three times per week.
If your hips sag at 12 seconds, your correct starting point is 12 seconds — not 20. Build the time gradually, but do not chase longer holds indefinitely.
How to Progress
Your first progression is simply to improve the quality of the kneeling hold. Then you can add another set, or gradually increase the hold time. After that, make the lever longer.
One option is to move the knees farther from the elbow while maintaining control. You can also reduce assistance from the top hand. The next major step is the full side plank from the feet. You do not need to rush there.
A sensible progression is: improve alignment first, then increase the hold, then add a set, then lengthen the lever, and finally move toward the full side plank.
What It Can and Cannot Do
The kneeling side plank can help you develop isometric strength, trunk endurance, shoulder support, and control against sideways bending. Those qualities are relevant to carrying, balance, walking, and single-leg movement.
But keep the claims realistic. It is not a guaranteed cure for low-back pain. It has not been proven that performing kneeling side planks alone prevents injuries. It does not permanently “fix” posture by itself. And it does not automatically improve athletic performance unless it is part of a broader programme.
The 20-Second Test
Now try this. Set up on your side with the knees bent and the elbow under the shoulder. Press the forearm into the floor. Lift the hips until your body is aligned. Breathe steadily for up to 20 seconds. Stop sooner if your hips sag, your torso rotates, your shoulder becomes painful, or you need to hold your breath. Then rest and repeat on the other side.
Your goal is not to prove that you can suffer through an arbitrary number. Your goal is to build the ability to keep your trunk organised while gravity tries to pull you sideways. That is what the front plank does not emphasise as directly — and that is why the kneeling side plank deserves a place in a well-rounded home strength routine.
📺 This article was adapted from a PeakPhysic video. Subscribe to PeakPhysic for more science‑backed fitness insights.
Related tools: Strength Standards | Waist-to-Hip Ratio | BMI Calculator | More articles: Analytical Living
Author: Dr. Shirley Cheung. This content is for informational purposes only and does not constitute professional fitness or medical advice.